Installing Gyprock plasterboard is a vital skill for both professional contractors and DIY enthusiasts. It’s a versatile solution for creating smooth ceilings and walls, essential in both new constructions and renovations. Knowing how to correctly install Gyprock can transform the look and feel of any room.
Before beginning your Gyprock installation, it’s crucial to equip yourself with the necessary safety gear. Preparing your workspace and understanding the importance of safety measures will not only ensure a smoother workflow but also protect you from potential hazards.
This Gyprock installation guide will walk you through the steps and techniques required to achieve a professional finish. It’s to ensure that your installation meets both aesthetic and structural standards.
Essential Tools
- 38mm broad knife (for adhesive application)
- Hammer or cordless screwdriver
- Fine tooth saw
- Ladder and platform
- Board offcuts (used as packers)
- Tin snips
- Utility knife
- Staple gun and staples or nails
- Straight edge, pencil, and measuring tape
- Plasterboard lifter (recommended for ceiling installations)
Essential Materials
- Gyprock plasterboard
- Gyprock Acrylic Stud Adhesive
- Suitable fasteners (such as nails or screws for timber or steel frames)
- Metal corner bead
Additional Materials for Back-Blocking
- 200mm wide plasterboard strips
- Gyprock Back-Blocking Cement
- Bucket and water (for mixing cement)
- Laminating screws
- 6mm notched spreader
Preparing the Frame
Ensure studs and ceiling frames are spaced at 600mm max. This spacing is crucial for providing adequate support to the Gyprock sheets. Incorrect spacing can lead to weak points, potentially causing sagging or cracking of the plasterboard over time.
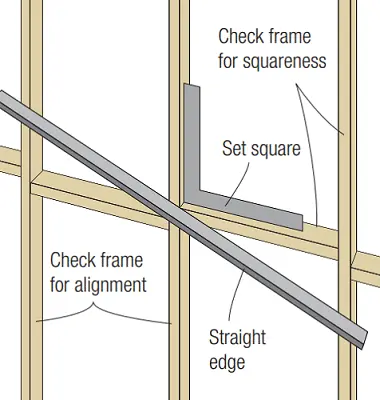
Align studs, noggings, and joists using a straight edge. They should be in a straight line to provide a flat surface for the Gyprock. Plane back or pack out uneven members. Misaligned frames can result in uneven walls or ceilings, making it challenging to achieve a professional finish.
Inspect the frame for any protruding nails or other obstructions. Remove them or hammer them down. Clean the surfaces of any dirt, paint, or grease. This step ensures a clean and even surface for adhesive application.
Gyprock Ceiling Installation
When renovating a room that includes both walls and ceilings, it’s advisable to start with the ceiling. This strategy helps prevent any potential damage to wall installations during the ceiling work.
For a step-by-step guide on how to install gyprock ceiling, ensuring it goes smoothly, follow the processes below.
1. Adhesive Application
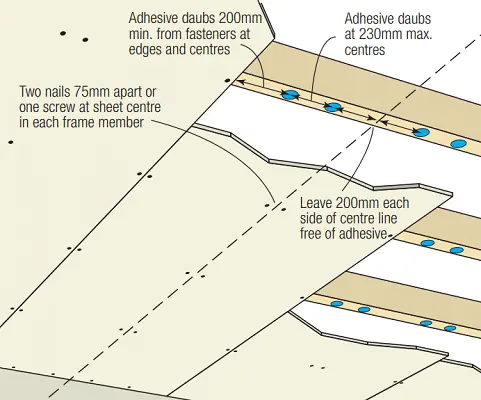
Begin by applying walnut-sized daubs of Gyprock Stud Adhesive to each joist. Start 200mm from the board’s intended edge and continue every 200 – 230mm, leaving a 200mm margin on either side of the centerline adhesive-free.
2. Sheet End Fixation
Avoid applying adhesive at joists where the sheet ends. These areas should be secured solely with nails or screws.
3. Sheet Installation
Position the sheets perpendicular to the joists. Attach them using nails or screws approximately 10–16mm from the edge along the recess. Ensures the fastener is slightly below the surface without tearing the paper face. For square set ceilings, remove the recess along the wall edge of the board.
4. Securing the Sheet
Press the sheet firmly against the adhesive and fix the opposite edge similarly.
5. Joist Fastening
Fasten the sheet to each joist at the centre, using either two nails spaced 75mm apart or a single screw.
6. End Fastening
At the sheet ends, use nails or screws at a maximum of 300mm intervals for cornice finishes, or 150mm intervals for square set ceilings.
7. Aligning Recessed Edges
Fit the next sheet so that the recessed edges are tightly butted against each other with no gaps, aligning them against the back block if used.
8. Continue Installation and Final Board Adjustment
Proceed with the installation process until the final board. Measure and cut the last board to fit, ensuring the cut edge is oriented towards the room’s wall side.
Back-Blocking
Proper back-blocking is essential for a sturdy and smooth Gyprock sheets installation. It involves using plasterboard strips, known as back-blocks. It helps prevent joint cracking and visible seams, ensuring a polished finish for your ceiling.
This method is particularly recommended to reinforce butt joints and recessed joints in ceilings. It is especially useful for securing butt joints that are not aligned with a joist or stud. Or in situations where the ceiling installation includes three or more recessed joints running across it.
1. Preparing Back-Blocks
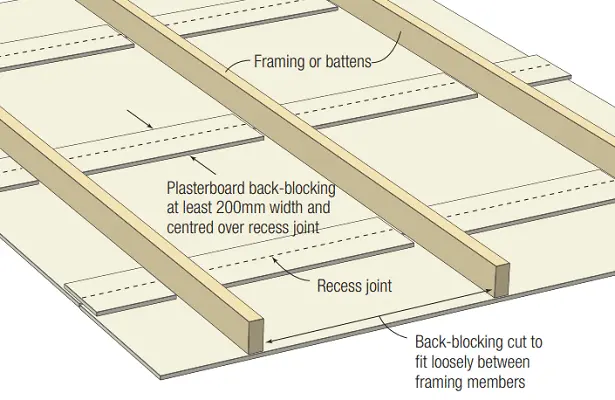
Cut back-blocks to a minimum width of 200mm, ensuring they are long enough to fit comfortably between framing members. The correct size of back-blocks is vital for providing adequate support without causing strain on the joint.
2. Applying Cement
Apply Gyprock Back-Blocking Cement to one side of the back-block using a notched trowel. Position the trowel at right angles to the joint direction for an even spread of cement, which is essential for a strong bond.
3. Placing Back-Blocks
Align the back-block along the edge of the sheet joint, positioning it so that half of its width is exposed. This exposed portion serves as a guide and connection point for the next sheet, ensuring a seamless and aligned joint.
4. Securing Back-Blocks
Fasten the back-blocks in place with laminating screws, driven through the recessed area approximately 10–16mm from the sheet edge. This careful positioning of screws ensures that the back-block remains firmly in place while minimizing the risk of damaging the plasterboard.
Gyprock Wall Installation
Fixing Gyprock plasterboard to walls is a detailed process that requires precision and attention to detail. You have to ensure the wall sheets fit neatly against the ceiling plasterboard, creating clean lines and angles.
To learn how to gyprock a wall properly, see the easy steps that come next.
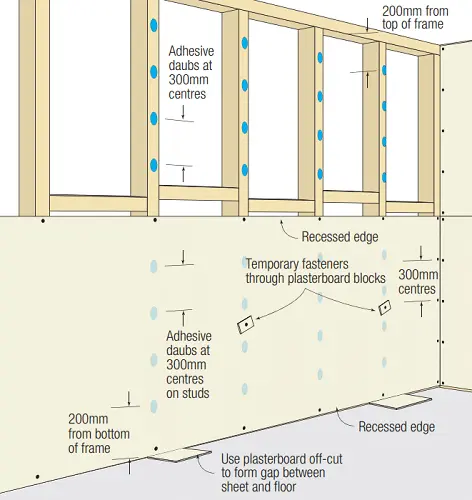
1. Adhesive Application
Begin by applying walnut-sized daubs of Gyprock Stud Adhesive to each stud. Start 200mm from the bottom of the frame and continue at maximum intervals of 300mm, keeping a 200mm margin clear on either side of where the sheet edges will be.
2. Sheet End Fixation
Do not apply adhesive at studs where the sheet ends. These points should be secured solely with nails or screws.
3. Preparing Packers
Place plasterboard offcuts on the floor against the frame as packers. This elevates the bottom edge of the sheet, aiding in precise installation.
4. Sheet Installation
Horizontally lift the plasterboard sheet onto the packers. Secure it to each stud with nails or screws approximately 10–16mm from the edge along the recess, ensuring the fastener is slightly below the surface without tearing the paper face.
5. Securing the Sheet
Press the sheet firmly against the adhesive and fix the opposite edge in the same way, ensuring a tight bond and alignment.
6. Edge Fastening
Nail or screw every 300mm around the ends of the sheet and any openings, carefully avoiding the adhesive daubs.
7. Short End Attachment
At points where short ends of sheets meet at a stud, use nails at maximum centres of 150mm or screws at maximum centres of 200mm.
8. Temporary Securing
While the adhesive dries, use temporary nails or screws, driven through a small plasterboard offcut, into every second stud in the middle of the sheet for additional support.
9. Bottom Sheet Installation
Once the bottom sheet is in place, measure and cut the top sheet to fit, ensuring one recessed edge remains intact for seamless joining.
10. Top Sheet Installation
Install the top sheet in the same manner, making sure that the recessed edges are butted together without gaps for a smooth finish.
11. Back-Blocking for Butt Joints
For any butt joints not located at a stud, refer to the back-blocking guidelines provided above. If the top board has a square cut edge for a square set ceiling, ensure this edge aligns with the ceiling.
External Corners
Once the ceiling and walls are covered with plasterboard, the final step is to install external corner beads.
External corner beads enhance the durability and appearance of plasterboard installations. They reinforce corners that protrude into a room and safeguard them from potential damage.
1. Corner Alignment
Begin by ensuring the plasterboard sheets are precisely aligned at the corner. If there is any overhang, carefully trim it using a utility knife for a neat edge.
2. Bead Preparation
Measure and cut the external bead to the required length using tin snips. Accurate cutting is essential for a snug fit along the corner.
3. Fitting the Bead
Position the bead onto the corner, holding it steady with staples or temporary nails. The bead must fit perfectly flush against both walls.
4. Securing the Bead
Use a straight edge to verify the bead’s alignment, ensuring it is perfectly straight. Secure it by stapling or nailing through both legs at each end and at intervals of 500mm along its length.

PVC Corner Beads
PVC corner beads are an alternative option to enhance resilience and suitability for wet areas. Although slightly more challenging to install, they are less prone to denting upon impact and are highly recommended for moisture-prone environments.
To install PVC corner beads, adhere them to the plasterboard edges using Gyprock Base Coat, followed by the jointing system.
Completing Your Gyprock Installation Project
Installing Gyprock sheets, whether on ceilings or walls, requires a methodical approach, precision, and attention to detail. By following these steps in the recommended order, you can ensure a robust and visually appealing finish.
Remember, the success of your Gyprock installation hinges not just on the methods used but also on the care and patience exercised throughout the process. Whether you’re a professional contractor or a DIY enthusiast, mastering the techniques will enable you to upgrade any space into one with smooth, durable walls and ceilings, crafted to last.
Source: Installing Gyprock® plasterboard
Need Help with Your Gyprock Project? We’re Here for You
If you’re facing a Gyprock installation project and can’t DIY, don’t worry – Perth Ceiling and Walls is here to help. Specializing in professional Gyprockk installations, our team is equipped to take on any challenge.
Whether you’re renovating a ceiling or building anew, we’re ready to transform your space with our skilled craftsmanship and attention to detail. Contact us today and take the first step towards transforming your space with expert plasterboard installation.
Reviewed by
Aaron Kumar
Aaron Jefferson Kumar. The owner and operator of Perth Ceiling and Walls. With hands-on expertise in plasterboard ceiling and wall repairs and installations, Aaron takes pride in ensuring every project meets the highest standards of quality and craftsmanship. His direct involvement in both the business and the fieldwork positions him as a trusted person on all things related to ceiling and wall solutions.